How to Use the Image Resize Tool for Quick and Easy Image Editing
A Step-by-Step Guide to Flipping, Resizing, Scaling, and Saving Images in Various Formats
Resize an image into diffrent size is a common task. It is useful for graphic design, web development, and creative projects. You can divide an image for photo collages, social media grids, or printing. Online tools make this process quick and easy. This guide explains how to resize images into 16:9 4:3 or bigger size .
The Image Resize Tool is a powerful yet easy-to-use application designed to help users quickly edit and manipulate images. With features that include flipping, resizing, scaling, and format saving, this tool can be used for a variety of tasks such as preparing images for social media, website design, or personal projects.
Key Features
-
Image Flipping
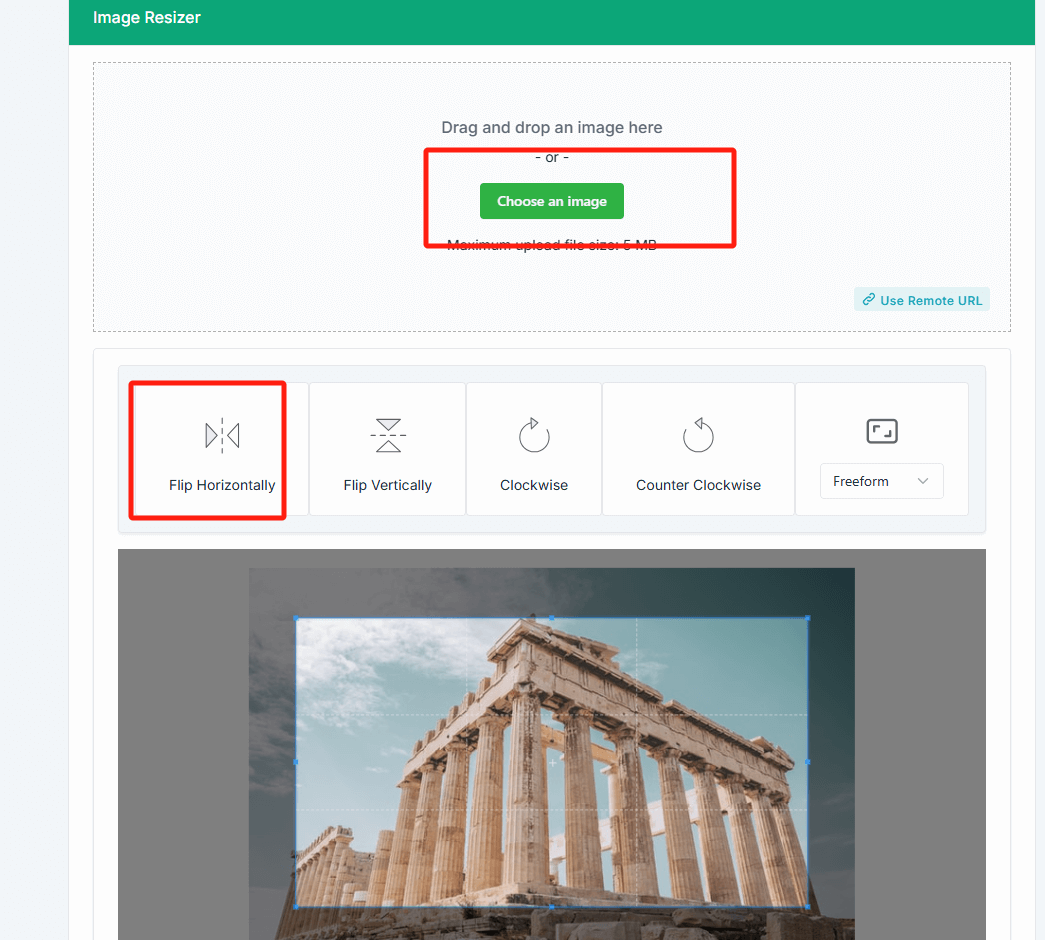
- Horizontal Flip: Flips the image along the horizontal axis, creating a mirror effect. This is ideal for creating symmetrical designs or correcting image orientations.
- Vertical Flip: Flips the image along the vertical axis, often used for producing mirror images or creative effects.
- Clockwise Rotation: Rotates the image 90 degrees clockwise. This feature is useful for correcting the orientation of landscape or portrait images.
- Counterclockwise Rotation: Rotates the image 90 degrees counterclockwise, perfect for images that need to be flipped in the opposite direction.
-
Resize Options
- Predefined Aspect Ratios: Resize the image to common aspect ratios:
- 16:9: Ideal for HD displays, YouTube thumbnails, or videos.
- 4:3: Often used for traditional TV screens or older formats.
- 1:1: Perfect for Instagram posts and square-format displays.
- 2:3: Common for photographic prints or full-screen display.
- Random Size: This option randomly resizes the image, ideal for projects that require a variety of image dimensions.
- Predefined Aspect Ratios: Resize the image to common aspect ratios:
-
Scaling
- Magnification: Specify a magnification factor to scale the image by a certain percentage (e.g., double or triple the size), while maintaining the original aspect ratio.
-
File Format Saving
- After editing the image, users can save it in various formats such as JPEG, PNG, GIF, BMP, and more, depending on the use case and quality preference.
Why Resize an Image ?
Resize images has many use case scenarios:
-
Social Media Management: Quickly resize images to fit the required dimensions for social platforms like Instagram, Facebook, or Twitter. Flip and rotate images for a unique and engaging presentation.
-
Web Design and Development: Resize images to fit specific web page layouts, whether for banners, headers, or thumbnails. The tool's flexible aspect ratio options make it easy to match different screen sizes.
-
Marketing and Advertising: Adjust images for online ads, print materials, or promotional content. Use flipping or resizing features to create dynamic visuals that stand out.
-
Personal Projects and Art: Create personalized artwork, photo edits, or design pieces. Use flip and resize features to experiment with different effects and formats.
Step-by-Step Guide
-
Launch the Tool
- Open the Image Processing Tool and select the image you want to edit.
-
Flip the Image
- To flip the image horizontally, click on the "Horizontal Flip" button.
- To flip the image vertically, click on the "Vertical Flip" button.
- To rotate the image clockwise, click on the "Clockwise Rotate" button.
- To rotate the image counterclockwise, click on the "Counterclockwise Rotate" button.

-
Resize the Image
- To resize the image to a predefined aspect ratio, select one of the following options:
- 16:9
- 4:3
- 1:1
- 2:3
- For a random size, simply select the "Random Size" option, and the tool will automatically adjust the image dimensions.

- To resize the image to a predefined aspect ratio, select one of the following options:
-
Set the Magnification
- To scale the image, enter the desired magnification factor (e.g., 2x or 3x) in the "Magnification" field. This will increase the size of the image proportionally.

- To scale the image, enter the desired magnification factor (e.g., 2x or 3x) in the "Magnification" field. This will increase the size of the image proportionally.
-
Save the Image And Download Image
- After making the desired changes, click the "Save" button.
- Choose the file format (e.g., JPEG, PNG, GIF, BMP) and specify the location to save the file.
- Enter a name for the image file and click "Save" to complete the process.

5. Tips and Considerations
-
Quality Loss: Be mindful when magnifying images, as scaling up too much may lead to a loss in image quality. Always start with a high-resolution original image for the best results.
-
File Format: JPEG is ideal for photographs and images with lots of colors, while PNG is better for images with transparency. Choose the format based on your specific needs.
-
Aspect Ratio Awareness: When resizing images, ensure that the aspect ratio matches the platform or design specifications you're working with to avoid distortion.
With these easy-to-use features, the Image Resize Tool makes it effortless to manipulate and enhance your images to fit your creative needs.


